Άρθρα κατηγορίας "Windows"

How to Fix svchost.exe using 100% of CPU

Here is a problem I have been coming across more and more. About 30secs to 1 minute after booting into Windows the computer starts lagging heavily. When CTRL+ALT+DEL is pressed it shows that svchost.exe is using up maximum CPU resources and only occurs when Automatic Updates is enabled. Microsoft has recognized this problem and has released a patch. However, on all computers I have worked on with this problem, the Microsoft patches don’t fix the problem. This is a guide on how to fix this problem with svchost using maximum CPU.

First of all, to identify if you have this problem you need to press CTRL+ALT+DEL all at the same time, go to the “Processes Tab” and then press “Mem Usage”. If you have this svchost.exe memory leak bug after about 1 minute you will see that the amount of memory usage svchost.exe uses will keep increasing until CPU becomes 99 or 100%. Below is an example of what this looks like:

svchost.exe memory leak shown in Windows Task Manager

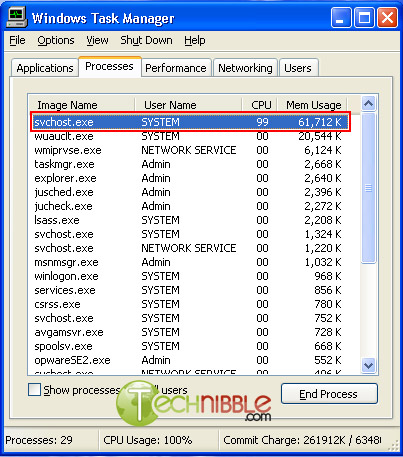
How to stop svchost.exe using up 100% system resources (Windows XP Only):

  • Visit the Microsoft website and Download Windows Update v3 WindowsUpdateAgent30-x86.exe and save it to your C:\ drive
  • Download this file fix_svchost.bat (right click and choose save as..) and save it to your C:\ drive
  • Download this file WindowsXP-KB927891.exe and save it to your C:\ drive
  • Reboot the computer and log in to Windows XP in safe mode. To do this, press F8 just before the WindowsXP logo shows up during boot and press up to choose “Safe Mode”
  • Once Windows has loaded and you have the option of which user account to use, log on as “Administrator”.
  • Click Start > Run, choose the Browse button and find the fix_svchost.bat file you saved before, press Open, then OK.
  • A black screen will pop up and white text will scroll past. Wait for this process to finish as it could take several minutes. It will close itself when its finished.
  • Once the black screen disappears, Click Start > Run, choose the Browse button and find the WindowsUpdateAgent30-x86.exe file you saved before, press Open, then OK. Follow the prompts as it installs.
  • When Windows Update Agent finishes installing, Click Start > Run, choose the Browse button and find the WindowsXP-KB927891.exe file you saved before, press Open, then OK. Follow the prompts as it installs.
  • Reboot the computer

Good old Ιnternet Εxplorer 6 download

Λίγα χρόνια πριν ήταν πρωτοποριακός.Πλέον ανήκει στην κατηγορία oldies but goodies…

Για κάποιους είναι ο καλύτερος explorer της Microsoft καθώς ποτέ δεν μπόρεσαν να εξοικειωθούν με τις επόμενες εκδόσεις 7 και 8 και το περίεργο interface τους.

Ένας explorer ελαφρύς,γρήγορος και “clean”.Παίζει και σε windows 2000,ενώ τα περισσότερα site ακόμη και σήμερα επιμένουν να είναι “ie6 compatible”.

Αν στα πλαίσια του γενικότερου downsizing,ξεθάψατε κανά παλιό pc-άκι και θέλετε αξιοπρεπές σερφάρισμα με Win 2000,o IE6 είναι ό,τι πρέπει.

Δυστυχώς η Microsoft δεν τον προσφέρει πλέον για κατέβασμα,σε περίπτωση όμως που σας είναι απαραίτητος ή απλά σας έλειψε,μπορείτε να τον κατεβάσετε από εδώ!

Advanced System Care

Το Advanced SystemCare free είναι ένα δωρεάν πολυεργαλείο για τον υπολογιστή σας. Με ένα μόνο κλικ σας βοηθάει στην προστασία, την επισκευή, την καθαριότητα, και την βελτιστοποίηση του PC σας. Με πάνω από 100 εκατομμύρια downloads από το 2006, αυτό το φανταστικό, βραβευμένο και ελεύθερο λογισμικό επισκευής PC, είναι ένα “must-have” εργαλείο για τον υπολογιστή σας. Πλέον υποστηρίζεται και από την Ελληνική γλώσσα!

Μπορείτε να το κατεβάσετε από εδώ.

Ένας γρήγορος τρόπος δημιουργίας προστατευμένου κοινόχρηστου φακέλου στα windows xp


f your looking to password protect a shared folder on your network, you’ve probably noticed that Windows XP doesn’t have any built in features allowing you to lock access to a folder via a password like previous Windows releases did. This means that anyone using the same workgroup or domain can access the files within your shared folder.

The good news is that there is a work around that seems to do the trick and simply involves creating a password for the guest account. Since shared folders are accessed on the network using the guest account, once the password for the guest account is set, a user in your workgroup or network domain must supply a valid username and password for the guest account to access the shared folder and contents within.

Password protecting a shared network folder:

Log into Windows XP as an Administrator
Click Start -> Control Panel -> User Accounts, then click on Guest Account and make sure it is turned on
Now Click Start -> Run, type cmd in the entry box, and click Ok
At the command prompt, type Net user guest password and press Enter
Again, Click Start -> Control Panel -> User Accounts, then click on Guest Account
Notice that you can now set a password on the Guest Account. Set a Password and restart your Computer

Set a Guest Password to password protect shared folder

Now, when a person tires to access your shared folder, they will be prompted for a username and password to continue. Use the username “Guest” and “password” you have set to access the password protected shared folders from your network.

Ρυθμίσεις και εγκατάσταση του Abby Fine reader 9

Για την εγκατάσταση του προγράμματος, κάνουμε τα παρακάτω:

  1. Τρέχουμε το Set up και στην καρτέλα που εμφανίζεται επιλέγουμε επόμενο.
  2. Στην επόμενη καρτέλα, επιλέγουμε με τα βελάκιαI accept the license Aagreements και με το Tab, βρίσκουμε την επιλογή επόμενο και πατάμε Space.
  3. Στην επόμενη καρτέλα, επιλέγουμε με τα βελάκια Τυπική εγκατάσταση και με το Tab, βρίσκουμε την επιλογή επόμενο και πατάμε Space.
  4. Τέλος, στην επόμενη καρτέλα, βρίσκουμε την επιλογή Install και πατάμε Space.
  5. Αφού ολοκληρωθεί η εγκατάσταση, πατάμε την επιλογή Finish, για να εξέλθουμε από το πρόγραμμα.

Ενεργοποίηση και Registration:

Αφού ολοκληρώσουμε την εγκατάσταση, εκτελούμε το πρόγραμμα και μας εμφανίζει 2 επιλογές:

Η πρώτη αφορά εάν θέλουμε να αγοράσουμε το πρόγραμμα και η δεύτερη να πληκτρολογήσουμε το Serial number.

Εμείς επιλέγουμε Activate by serial number, πατώντας Space επάνω της.

Στα κουτάκια που εμφανίζονται, πληκτρολογούμε το σειριακό αριθμό που διαθέτουμε, πληκτρολογώντας 4 ψηφία σε κάθε κουτάκι.

Μόλις ολοκληρώσουμε την τοποθέτηση των ψηφίων σε όλα τα κουτάκια, βρίσκουμε με το Tab την επιλογή επόμενο και πατάμε Space.

Στην επόμενη καρτέλα, επιλέγουμε με τα βελάκια Activate by internet και με το Tab βρίσκουμε την επιλογή επόμενο και πατάμε Space.

Στην επόμενη καρτέλα, πληκτρολογούμε στα αντίστοιχα κουτάκια το όνομα, το επώνυμο, Χώρα, διεύθυνση, πόλη, e-mail, τηλέφωνο και οτιδήποτε άλλα στοιχεία διαθέτουμε.

Εάν δε διαθέτουμε στοιχεία για μερικά από τα παραπάνω πεδία, απλώς τα αφήνουμε κενά.

Αφού ολοκληρώσουμε και αυτή τη διαδικασία, πατάμε επόμενο.

Κάνουμε το ίδιο και στην επόμενη καρτέλα.

Μόλις ολοκληρωθεί η ενεργοποίηση, εμφανίζεται μήνυμα το οποίο μας δείχνει ότι η ενεργοποίηση μας ήταν επιτυχής. Εμείς επιλέγουμε Τέλος και πατάμε Space. Διαβάστε όλο το άρθρο »

Eπαναφορά του πρωτοκόλλου Internet (TCP/IP)

Ένα από τα στοιχεία της σύνδεσης στο Internet στον υπολογιστή σας είναι μια ενσωματωμένη ομάδα οδηγιών που ονομάζεται TCP/IP. Το πρωτόκολλο TCP/IP ενδέχεται κάποιες φορές να καταστραφεί. Αν δεν μπορείτε να συνδεθείτε στο Internet και έχετε δοκιμάσει όλες τις άλλες μεθόδους για να επιλύσετε το πρόβλημα, ενδέχεται το πρόβλημα να οφείλεται στο πρωτόκολλο TCP/IP.

Επειδή το πρωτόκολλο TCP/IP είναι ένα βασικό στοιχείο των Windows, δεν μπορείτε να το καταργήσετε. Ωστόσο, μπορείτε να επαναφέρετε το πρωτόκολλο TCP/IP στην αρχική του κατάσταση χρησιμοποιώντας το βοηθητικό πρόγραμμα NetShell (netsh).

Επίλυση για πιο έμπειρους χρήστες

Ακολουθήστε τα εξής βήματα Διαβάστε όλο το άρθρο »

Ετικέτες: , ,

Αλλαγή μεγέθους γραμματοσειράς
Αντίθεση