

![]() Left motor
Left motor
![]() Right motor
Right motor

![]() Port Selector
Port Selector
![]() Mode Selector
Mode Selector
![]() Inputs
Inputs
Select the two motors (A, B, C, or D) that you want the Move Tank block to control by using the Port Selector on the top of the block. Click on each motor letter to choose the port for that motor. The first port should be the motor on the left side of the vehicle, and the second port should be the motor on the right side.

The On mode turns both motors on, then immediately continues to the next block in the program. You can control the speed and direction of the motors using the Power Left and Power Right inputs. The motors will run until they are stopped or changed by another block later in the program, or until the program ends.
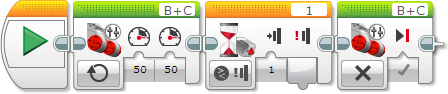

The Off mode turns both motors off. Use the Off mode to stop a robot that was started by the On mode earlier in the program. See the example above.
If Brake at End is True, the motors are stopped immediately. The motors will be held in their stopped position until another Move or Motor block starts them, or until the program ends. If Brake at End is False, power to the motors is simply turned off. The motors will coast using any remaining momentum until they stop, or until another Move or Motor block starts.

On for Seconds turns both motors on for the number of seconds in the Seconds input, then turns them off. The block will wait until the time has passed before the program will continue to the next block.
You can control the speed and direction of your robot using the Power Left and Power Right inputs. Use Brake at End to stop your robot after exactly the specified number of seconds.


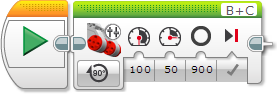
On for Degrees turns both motors on, waits until one of them has turned for the number of degrees of rotation in the Degrees input, and then turns both motors off. This can be used to make your robot travel a specific distance or turn a specific amount. 360 degrees of rotation corresponds to one full turn of a motor.
You can control the speed and direction of your robot using the Power Left and Power Right inputs. Use Brake at End to stop your robot after exactly the specified number of degrees.”

The program below will make a robot turn in an arc to the right, because Power Left is greater than Power Right. The turn will continue until the left motor (the outside and faster one) has turned exactly 900 degrees, then the robot will stop.
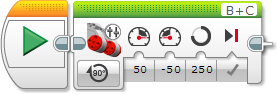

On for Rotations turns both motors on, waits until one of them has turned for the number of rotations in the Rotations input, then turns both motors off. This can be used to make your robot travel a specific distance or turn a specific amount.
You can control the speed and direction of your robot using the Power Left and Power Right inputs. Use Brake at End to stop your robot after exactly the specified number of rotations.”

| Rotations | Degrees |
|---|---|
| 1 | 360 |
| 2 | 720 |
| 0.5 | 180 |
| 1.25 | 450 |
| 7.2 | 2592 |
The Power Left and Power Right inputs accept a number from -100 to 100. Positive and negative numbers make the Large Motor turn in different directions, as shown in the graphic below.

![]() Positive Power
Positive Power
![]() Negative Power
Negative Power
You can change the normal rotation direction for a motor using the Invert Motor block. If a motor direction has been inverted, the effect of positive and negative power levels will be the opposite of that shown above.
| Input | Type | Allowed Values | Notes |
|---|---|---|---|
| Power Left | Numeric | -100 to 100 | Motor power level for the left motor. See Motor Power and Direction. |
| Power Right | Numeric | -100 to 100 | Motor power level for the right motor. See Motor Power and Direction. |
| Brake at End | Logic | True/False | Applies when the block finishes. If True, the motors are stopped immediately and held in position. If False, motor power stops and the motors are allowed to coast. |
| Seconds | Numeric | ≥ 0 | Movement time in seconds. |
| Degrees | Numeric | Any Number | Amount of movement amount in degrees. 360 degrees make a full rotation. |
| Rotations | Numeric | Any Number | Amount of movement in rotations. |