Storytelling for kindergarten (and, of course, primary school) children is highly beneficial. Not only does it inspire imagination, but it’s also highly engaging. It captivates young learners’ attention, acts as a language booster, and ignites a love for literature.
Using puppets, props (even the simplest ones can have a tremendous effect on the little ones! – try pressing all your fingers to the front, using your hand as a beak and then engage in a dialogue with it), body language and animated voice can encourage imagination and creativity and foster social interaction: children empathize with characters and engage in discussions, developing, thus, their critical thinking, a much sought-after skill not only for their personal growth but also for their academic success. Sometimes nothing else is needed when telling a story other than imagination: creating mental pictures and getting the children physically engaged through movement can do the trick (‘imagine being the wind that blows the leaves off the tree, or being the leaf thrown out of the tree by the wind!’, ‘imagine climbing up the beanstalk, careful not to slip and fall, looking down as we climb’).
Finding the age-appropriate book for our students is of paramount importance. Books that contain simple language (or you can simplify it yourself as you read), and repetitive patterns are very helpful: fun aside, repetition can boost students’ confidence, consolidation of new vocabulary and sentence structures.
And how should you narrate (or read) a story? Standing or – better – sitting in the middle of a designated storytelling area is a good idea. A storytelling chair can serve as a focal point for teacher-student interaction during storytelling sessions, fostering a positive learning atmosphere. It can enhance engagement, create a sense of anticipation, and provide a comfortable and focused environment for children, making the storytelling experience more memorable and enjoyable.
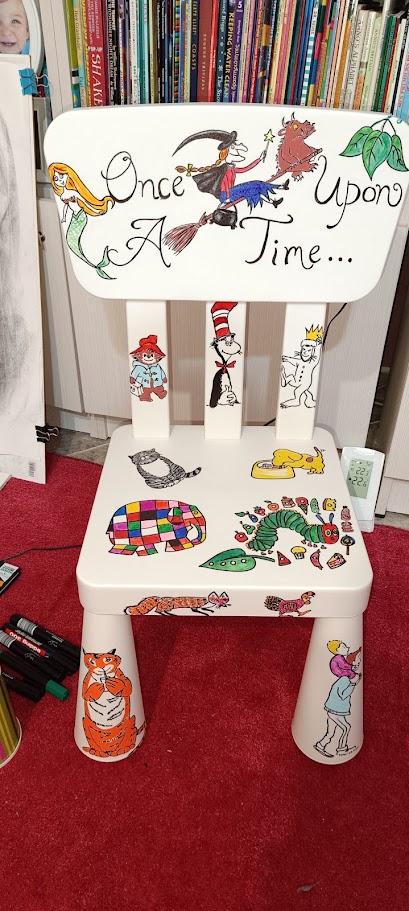
I’ve had my eye (and set my heart!) on getting one – but then I thought: why not MAKE one? So I bought a plastic chair with ample writing space and got a pencil, a rubber and some permanent markers, and some days later … my storytelling chair was ready!!!
You can see the story of my chair unfold here:
Ways to use a strorytelling chair
Tell stories and repeat them often. Children feel more confident listening to stories when they know them inside out and know exactly what comes next.
When children become very familiar with certain stories invite them to sit on the storytelling chair and recount (or repeat) a part of the story. Anyone who sits in it becomes the storyteller with powers to entrance their listeners!
Have students identify another character on the chair. What would happen if the hero of the story met another hero (and became good friends with them?) – time for some critical thinking and communication development then!
Food for thought
How about you?
How would you use a storytelling chair?
Can you find the stories that appear on my chair?
How many can you find?
(here is something that will help you 😆 Books that appear on the storytelling chair)
How many have you used in your teaching?
Most importantly, have fun and enjoy the process yourself: approach storytelling with enthusiasm and joy. Your genuine passion for the story will be contagious, and the child will sense your enjoyment and engagement.


