You may have already used a filter or two in Photoshop (perhaps as a step in an earlier chapter). In this chapter, filters are the star players. Depending on which filters you apply and which settings you choose, the results can range from a subtle change to a total morph.A–B You can make an image look (almost) as if it’s hand painted, silk-screened, or sketched; apply distortion; add a pattern, texture, or noise; create a mosaic or a patchwork of tiles—the creative possibilities are infinite. Once you start using the Filter Gallery, you’ll see … time will fly by.
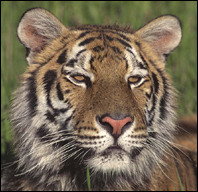 A This is the original image.
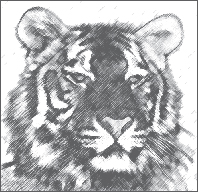 B We applied the Charcoal filter.
Using this chapter, you will learn techniques for applying filters, including using the Filter Gallery and Smart Filters, and use filters to make a photo look like an oil painting or tinted drawing. (To locate tasks in which we use individual filters, see “Filter menu” in the index.)
Applying filters
You can apply filters to a whole layer or just to a selection on a layer. Most of the Photoshop filters are applied either via the Filter Gallery or via an individual dialog. A small handful of them, such as Clouds and Blur, are applied in one step simply by choosing the filter name from a submenu on the Filter menu. If you apply a filter to a Smart Object, it becomes an editable, removable Smart Filter (see pages 344–345).
If you try to select a filter and discover that it’s not available, the likely cause is that it’s incompatible with the current document color mode or bit depth. All the Photoshop filters are available for RGB files, most of the filters are available for Grayscale files, fewer are available for CMYK Color, Lab Color, and 16-bits-per-channel files, still fewer are available for 32-bits-per-channel files, and none are available for Bitmap and Indexed Color files.
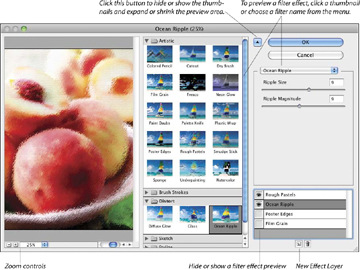
Most of the Photoshop filters are housed conveniently under one roof in the Filter Gallery dialog. There you can preview dozens of filters and filter settings, show and hide each filter effect that you’ve already previewed, and change the sequence in which Photoshop applies them to your document.
To use the Filter Gallery
- Click an image layer; or for more flexibility, click a duplicate image layer or a Smart Object (see “To apply a Smart Filter” on page 344).
- Optional: To limit the filter to a specific area of the image, create a selection.
- The Foreground and/or Background colors are used by many filters (see the sidebar on this page), and you must choose those colors now, before opening the Filter Gallery.
- Choose Filter > Filter Gallery. The resizable gallery opens (A, next page).
- To change the zoom level for the preview, click the Zoom Out button
 or Zoom In button
  in the lower-left corner of the dialog, or choose a preset zoom level from the menu. (If the preview is magnified, you can drag it in the window.)
 - Do either of the following:In the middle pane of the dialog, click an arrowhead to expand any of the six filter categories, then click a filter thumbnail.
Choose a filter name from the menu below the Cancel button.
- On the right side of the dialog, choose settings for the filter.
- To edit the list of effects (bottom right portion of the dialog), do any of these optional steps:To apply an additional filter effect, click the New Effect Layer button,
 click a filter thumbnail in any category, then choose settings. The effect may take a moment or two to process.
To replace one filter effect with another, click a filter effect name on the scroll list (don’t click the New Effect Layer button), then choose a replacement filter and settings.
To hide a filter effect, click the visibility icon
 next to the effect name (click again to redisplay).
To change the stacking position of a filter effect to produce a different result in the image, drag the effect name upward or downward on the list.
To remove a filter effect from the list, click it, then click the Delete Effect Layer button.

- Click OK.
- To hide or show the previews in the Filter Gallery for all but one filter effect, Alt-click/Option-click the visibility icon for that effect.
- To remove a non-Smart Filter, click a prior document state or snapshot on the History panel.
- In Edit/Photoshop > Preferences > Plug-Ins, uncheck Show All Filter Gallery Groups and Names to list, on the submenus on the Filter menu, only filters that are not in the Filter Gallery, or check this option to list all Photoshop filters on the submenus, including those that are available in the Filter Gallery (the gallery opens when you choose a filter name).

Filters that Use the Foreground and Background Colors
The filters listed below use the current Foreground and/or Background colors. Some filters, such as Charcoal, Graphic Pen, and Photocopy (in the Sketch category), look good in the default Photoshop colors of black and white, whereas others look better in color. But don’t just take our word for it—experiment and see for yourself.
- Artistic > Colored Pencil (Background color), Neon Glow (Foreground and Background colors)
- Distort > Diffuse Glow (Background color)
- Pixelate > Pointillize (Background color)
- Render > Clouds, Difference Clouds, Fibers (Foreground and Background colors)
- Sketch > Bas Relief, Chalk & Charcoal, Charcoal, Conté Crayon, Graphic Pen, Halftone Pattern, Note Paper, Photocopy, Plaster, Reticulation, Stamp, Torn Edges (Foreground and Background colors)
- Stylize > Tiles (Foreground or Background color)
- Texture > Stained Glass (Foreground color)Reapplying the Last Filter Quickly
- To reapply the last-used filter(s) using the same settings, choose Filter > [last filter name or Filter Gallery] (Ctrl-F/Cmd-F).
- To reopen either the last-used filter dialog or the Filter Gallery showing the last-used settings, press Ctrl-Alt-F/Cmd-Option-F.
Using the Preview in an Individual Filter Dialog
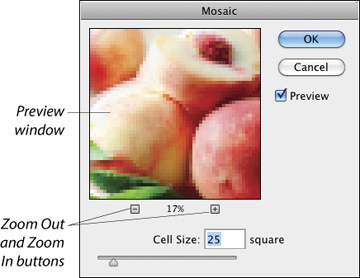
Some Photoshop filters are applied via an individual dialog (not via the Filter Gallery). Of those individual dialogs, some have a preview window and some do not.
- For individual filter dialogs that contain a preview window, you can click the + button to zoom in or the – button to zoom out (we usually do the latter). Most of the individual dialogs also have a Preview check box.
- In some filter dialogs (such as Blur > Gaussian Blur and Motion Blur), if you click in the document window (square pointer), that area of the image will appear in the preview window. You can drag the image inside the preview window.
- To compare the image with and without the current filter effect, click and hold on the preview, then release.