STEM Discovery Week 2019
Θα πάρουμε και εφέτος για δεύτερη χρονιά μέρος στην δράση STEM Discovery Week με αρκετά workshops. Δύο που έχουμε κάνει είναι τα παρακάτω:
Workshop1
Open and closed electric circuits, variables as properties of objects in object oriented programming and manipulation of broadcasting messages.
Students built a program that implements open and closed circuits. As described in the link below:
 |
 |
https://scratch.mit.edu/projects/63929852/
In this way they learned about the variables as properties of the objects, as well as using messages to communicate between the objects. The on variable determines whether the switch is on or off, and thus the state of the circuit. This exercise aims to make students familiar with the concepts of object-oriented programming. It also aims to help them understand the concepts of physics of the power source, the switch and of the open and closed circuits.
They started with the following program and made the code to complete it.
https://scratch.mit.edu/projects/287706968/editor
Workshop2
Η παρακάτω δραστηριότητα: Ohm’s law with spreadsheets έγινε με επιτυχία από
21/02/19 έως και 27/02/19
Ohm’s law with spreadsheets
Θα χρησιμοποιήσουμε το νόμο του Ohm για να εργαστούμε με τα βασικά στοιχεία της επεξεργασίας υπολογιστικών φύλλων.
Ο σκοπός αυτής της δραστηριότητας είναι να φτιάξουμε ένα γράφημα που να δείχνει την γραμμική σχέση ανάμεσα στην τάση στα άκρα ενός αντιστάτη και της έντασης του ρεύματος που τον διαρρέει και ταυτόχρονα να κάνει μια πειραματική επαλήθευση του νόμου του Ohm.
Μέσω αυτής της δραστηριότητας οι μαθητές θα εξασκηθούν και θα βελτιώσουν τις γνώσεις τους στο να:
- δημιουργούν επικεφαλίδες και να τις παγώνουν στην κορυφή.
- οργανώνουν και να ταξινομούν δεδομένα σε γραμμές και στήλες
- δημιουργούν ένα γράφημα από δεδομένα σημείων
- μοιράζονται και να συνεργάζονται για να διεκπεραιώσουν ένα έργο
- και τέλος θα εμβαθύνουν στο νόμο του Ohm που διδάχθηκαν στην φυσική
We will use Ohm’s law to work with the basics of data processing with spreadsheets. The purpose of this activity is to make a graph showing the linear relation between the voltage at the ends of a resistance and the intensity of the current and at the same time make an experimental verification of Ohm’s law. Through this activity students will practise and enhance their knowledge by:
• creating headings on a spreadsheet and freezing the headline line at the top.
• Organizing and classifying their data in columns and rows.
• creating a graph of their data.
• sharing, collaborating, and publishing in a spreadsheet activity using google sheets.
• understanding Ohm’s law as taught in physics.
Prior Knowledge Requirements
Basic knowledge of Ohm’s law
First we will use the Ohm law lab simulator from the Colorado University interactive simulation page
(https://phet.colorado.edu/sims/html/ohms-law/latest/ohms-law_en.html)

The students will work in pairs and they will put the resistance at a random value and then change the voltage at the ends of the resistor. The intensity of the current flowing through the resistor will be observed and recorded. The data will be recorded on a spreadsheet. When all of the measurements have been recorded, they will be entered on the appropriate graph for the given scenario (XY Divergence), then the trend line will be added and the equation for that line included.
Finally, students will make a brief summary of their results and will be asked to analyze the gradient of their graph in relation to the value of the resistance they select in the simulator.
Source: https://medium.com/@stevens.michael.a/ohms-law-with-spreadsheets-5d3274e8b0b3
Workshop3
Distance Calculation with Ultrasonic Sensor.
How Deep is the Ocean?

This activity is a continuation of an earlier activity we did this year with an infrared sensor. It came out of an idea of one of our students for making a safety device. We discussed and investgated the matter and we started with a prototype application with an infrared sensor.

Summary
In this activity, students learn about how ultrasonic sensors work and identify where else in nature they are found. For example, bats and dolphins use ultrasound waves to estimate distance, to move and find their food. Students identify other uses of sonar such as mapping the seabed and measuring the depth of the ocean. They also build an application with an ultrasonic sensor and program the microbit to show the distance from an object on the LED matrix of the micro:bit. They also build a model of a car parking application.
Areas involded: Biology, Computer Science, Science and Technology.
Pre Req Knowledge
- Basic programming, repetitions, if statements
- The formula of the average speed
Learning objectives
With the completion of this activity, the students will be able to:
- Describe how ultrasonic sensors work.
- Identify other species that use ultrasound to communicate, move and find their food.
- Program an application with the micro:bit that uses an ultrasonic sensor.
- Provide a basic explanation of how sensors are integrated into robots via programming.
- Explain other uses of ultrasonic sensors such as measuring the ocean depth, mapping the seabed and car parking sensors.

Bats use echolocation to find and identify objects in their surroundings.
To help robots identify objects, engineers have created ultrasonic sensors that operate using the same principles.
Copyright © (left) Wisconsin Department of Natural Resources; (right)LEGO url

Dolphins also use sonar to orient themselves, locate objects and determine object’s shape and size.
Copyright © Microsoft Education https://www.microsoft.com/en-us/education/oceans/lessons/measuring-ocean-depth/default.aspx
Ultrasonic distance sensors are designed to measure distance between the source and target using ultrasonic waves.
In this project we have used an Ultrasonic Sensor to determine the distance of an obstacle from the sensor.
https://www.hackster.io/arbazhussain/distance-calculation-with-ultrasonic-sensor-26d63e
How does an Ultrasonic Distance Sensor work?
The Ultrasonic Sensor sends out a high-frequency sound pulse and then times how long it takes for the echo of the sound to reflect back. The sensor has 2 openings on its front. One opening transmits ultrasonic waves, (like a tiny speaker), the other receives them, (like a tiny microphone).
The speed of sound is approximately 341 meters (1100 feet) per second in air. The ultrasonic sensor uses this information along with the time difference between sending and receiving the sound pulse to determine the distance to an object. It uses the following mathematical equation:
Distance = Time x Speed of Sound divided by 2
Why/When to use Ultrasonic Sensors ?
- Ideally suited to accurate, automatic distance measurement in normal and difficult environments.
- Particularly suitable for environments where optical sensors are unusable such as smoke, dust and similar.
- Very accurate, stable and can be used over large ranges.
Ultrasonic sensors can measure the following parameters without contacting the medium to be measured:
- Distance
- Level
- Diameter
- Presence
- Position
Functioning Of Project:
The ultrasonic sensor emits a high-frequency sound pulse and calculates the distance depending upon the time taken by the echo signal to travel back after reflecting from the desired target. The speed of sound is 341 meters per second in air. After the distance is calculated, it will be displayed on the LCD display.
 |
This is the sparkfun HC-SR04 ultrasonic distance sensor. This economical sensor provides 2cm to 400cm of non-contact measurement functionality with a ranging accuracy that can reach up to 3mm. Each HC-SR04 module includes an ultrasonic transmitter, a receiver and a control circuit.There are four pins on the HC-SR04: VCC (Power), Trig (Trigger), Echo (Receive), and GND (Ground). |
 |
The reason I chose this sensor is that it works on the 3V provided by the BBC micro:bit, therefore it enables us to construct a simpler circuit. |
https://www.sparkfun.com/products/13959
I connected the Vcc to the 3V pin of the microbit, the Trig to Pin 0, the Echo to Pin 1 and the GND to the GND of the micro:bit.

https://www.instructables.com/id/Distance-Sensing-With-the-Microbit-and-Sonar-HC-SR/
If you run this code on the micro:bit and move your hand in front of the sensor you will see the distance on the LED display of the micro:bit.

This project could be expanded to work as a prototype for a car parking alarm. Whenever your car comes near any object, the buzzer will ring and the LED will glow so that you don’t get your car damaged.
Connect one speaker or one buzzer on Pin 0 and rearrange the ping and echo pins on pins 1 and 2 of the micro: bit. Then use pin 0 to produce tones more and more often as the distance decreases (how a parking sensor works)
Ultrasound sensors were initially used in vehicles for detecting obstacles when parking but are now evolving into an automatic parking system.
Another idea is to make a device that will warn the cyclists if they are going too close to people or objects with their bike. The micro:bit can be programmed with the ultrasonic sensor so a grren LED will light when the distance is safe, a yellow LED when the bike is getting too close to an object or human and a red one if the bike is getting too close.
https://www.instructables.com/id/Distance-Sensing-With-the-Microbit-and-Sonar-HC-SR/


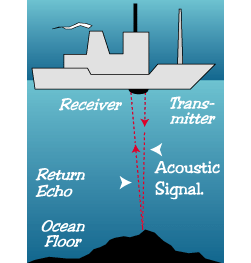
The same principle is used to calculate the water depth in the oceans. A transducer sends a sound pulse down into the water and picks up the reflected sound. The time it takes for the sound pulse to reach the bottom and return is measured precisely and the depth of the ocean is calculated by knowing how fast sound travels in the water (approximately 1,500meters per second).
https://dosits.org/people-and-sound/navigation/how-is-sound-used-to-measure-water-depth/
https://www.microsoft.com/en-us/education/oceans/lessons/measuring-ocean-depth
